Friday, January 6, 2012

My New Old Sewing Machine


I learned to sew on this machine when I was about 12 years old. It belonged to my mother and it's a few years older than I am. I'm probably giving my age away now. Two months ago she asked me if I wanted it and I took her up on the offer. I emptied out all of the drawers.... lots of old thread, buttons, pins and needles, snaps, hook and eyes, rick rack, hem tape, several pairs of dull scissors, patterns, the original tube of lube (looked like it had never been used), attachments galore, and the users' manuals. Not much in there that a quilter would use. But the manual sure came in handy when I decided to........


....take the machine apart, clean it, oil it, and lube it. And I'm happy to say that after putting it all back together.... it worked!! These old machines are so user friendly.


Look at all these attachments. Wouldn't you know that the one I really needed for quilting was not included. I had to get a darning foot, also known as a hopping foot or free motion quilting foot.


Here is the button hole attachment. I remember my mom using it but if I really need to make a button hole I will probably use my other machine because it would be easier than this contraption.


The chair has storage in the seat but that old gold vinyl covering had seen its better days. Doesn't it look so much better now ??


Here are a few table runners and small quilts I did on this machine.


My free motion quilting is getting better and better on each quilt. I am enjoying this old machine and I'm sure it will see me through many more projects. Thanks Mom!!


Monday, January 2, 2012

Chocolate Figs Quilt

It's finally finished! I worked on this quilt for almost three months. It is machine pieced and hand quilted. I used Moda Bella Solids Brown and Butterscotch and Rose charm packs by Fig Tree Quilts also by Moda with a Bella Solids Red binding.


Here is a close-up of the stitching and backing.

 
And this is what it looked like in the frame before I started the hand quilting.

Tuesday, November 1, 2011

LSU Quilt

In honor of the big SEC football game coming up this weekend
and being a Louisiana girl, I was inspired to make an LSU quilt.

LSU vs. Alabama

Both teams are undefeated so far this season.
That  streak will end for one team this Saturday.


The quilt piecing was simple...
Two purple strips, one tiger print strip,
and two cheddar yellow pieces to finish it off.
The quilting was all done by machine with straight lines -
 diagonal on the cheddar, channels on the stripes.
The backing is one big piece of tiger print.
Finished size - 37 x 39 inches.


Sometimes simple is better :-)


Geaux tigers!


Wednesday, October 26, 2011

CMYK Quilt

One of my English professors once gave us an assignment to describe the room
 without using any verbs. Let's see if I can describe this quilt verblessly. 

Ink colors... cyan, magenta, yellow, and black (or key)... CMYK
  Four strips of bold color and two panels of gray.
Each the width of the fabric, approximately 42 inches.
Easy piecing. Straight line quilting - vertical and diagonal.
Black binding. 

 
Matching Thread

 
Lovely!

Fun and Easy!

For sale on Etsy....


Monday, October 24, 2011

Ruby Quilt

This was my weekend project. Started on it Friday afternoon and finished putting the binding on it at 10pm on Sunday, right as the New Orleans Saints were winning big on Sunday Night Football. It could be used for a baby quilt or a table topper.

I didn't use a pattern... just made it up as I went.

Supplies needed

One Moda charm pack - I used Ruby, but any one will do
One yard - solid white cotton fabric for sashing
One yard - solid red cotton fabric for inside border and binding
3 yards - matching fabric for wide floral border and backing
Other items - cotton batting, sewing thread for piecing,
machine embroidery thread for quilting

I was worried about the thread since I was stuck at home and couldn't go to the store. My car is still in the shop being repaired after a little fender bender. I didn't have enough of any coordinating color thread like I usually use for the quilting so I used machine embroidery thread. It's finer and shinier and worked just fine. I even ran the quilt through the washer and drier after I finished it to make sure everything held up.... and it did. Now that I know about the embroidery thread, I have a whole other stash I can use and just about every color I will ever need. Lord knows I'm not doing much embroidery these days.


Wednesday, October 19, 2011

Same pattern, different colors

I've made a quilt with this pattern before and it turned out so beautiful that I just had to do it again. The first one was made with the most boring of all the colors in my batik stash.... brown, grey, gold, black, a little dark blue. Not that they were ugly, just not as bright as the others. It's for my son and I didn't want it to look girlie.
This time it's bright and cheery colors. Aqua, blue, green, magenta, purple.
First thing first..... cut fabric into 2.5 inch strips.


Celebrate the end of strip cutting by oohhing and ahhing, petting, fanning,
and maybe posting some pictures on facebook for your friends to see
what you're up to.


Next.... cutting strips into 2.5 x 6.5 inch pieces and 2.5 x 2.5 inch squares.
More oohhing and ahhing!

 
Now for the sewing! I started by sewing the little square pieces together first,
chain piecing to save on thread, then sewed the longer pieces to each side
to make the blocks. I pressed each seam as I went.

Q: What is chain piecing? A: Sewing two pieces together, then without lifting the
presser foot or cutting the thread, sew the next two pieces.
This take a little organization so as not to sew the wrong pieces together.


The blocks are all made. Ready for tomorrow's sewing session 
I need a break :-)


With scrappy quilts, some people prefer to just start sewing the blocks together
randomly, but I like to lay them all out and rearrange them until I don't see two of the
same color next to each other. I usually start with the boldest or darkest color and
spread them out in the design so the eye will jump around the quilt to each one.

 
Sew the blocks into rows.....

Then sew the rows together, matching up the seams so the corners all
meet perfectly. Well, okay, get them as perfect as possible. If they are off
by too much, your quilt edges will not be straight. I like mine perfect because
I am not friends with my seam ripper.

And it's done ! ! ! Ready for quilting.


Here's the link to the other one I made with this pattern.
I hope you are inspired ! !

Saturday, August 20, 2011

Grandmother's Flower Garden Table Runner

Everywhere I look, these hexagon quilts keep popping up and I am fascinated by them. They remind me of the olden days. I did some research and spent days online looking at all the gorgeous quilts made by others. This pattern is traditionally known as Grandmother’s Flower Garden (GFG) and the hand-piecing technique is called English Paper Piecing (EPP). The flowers generally have a yellow center surrounded by one or two rounds of other colors. However, the hexes are not always arranged as flowers and can take on a more contemporary look when used with bold pattern prints and sewn in various other arrangements. Some quilts are made up entirely of hexagons while other have the flowers appliquéd onto a solid background block.

So I decided to try a small table runner project.....

 
Step 1: On a hexagon coloring sheet (available freeonline) choose your pattern arrangement and color it in.  I couldn't find just the right shade of red for my outside border so I later changed it to dark green.


Step 2: You will need about a hundred or so hexagons for a project this size, more if you want to make a full size quilt. They can be removed as you work away from the center and reused, but will need to remain in the outermost rows until the project is finished. You can buy these pre-cut, but I printed out my own on cardstock paper. Cutting them out while watching TV was quite enjoyable. Just be sure to cut exactly on the line because they all need to be exactly the same size.

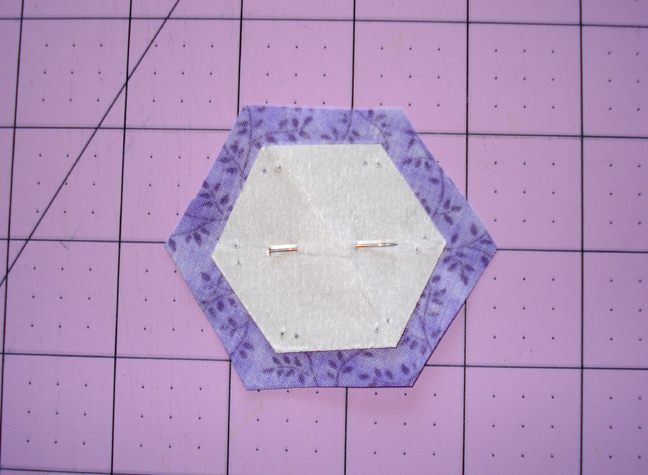
Step 3: Cut your fabric into squares and pin a fabric square to a paper hexagon. I used 3.5-inch squares on 1-inch hexes. Each edge is 1-inch, not the diameter.

Step 4: This step is optional, but if you want to remove some of the bulk, trim the fabric to about ¼ inch around the paper hexagon after you pin it.


Step 5: Fold the edges of the fabric over the hexagon and baste in place going through the paper hex and the fabric. These stitches will be removed later in the project so if you don't knot your thread they will be easier to remove. This is a good place to use up old thread or that last little bit on the spool or bobbin. Make enough of these in each color to complete your design.


Step 6:  Place two basted hexagons with right sides together and whip stitch along one edge. (Sorry, there is no photo of this step.) If you are making flowers like I did, start with the center hex and whip stitch the six petals around it, then whip stitch the petals to each other. Eventually, all the sides will be stitched so it doesn't really matter which sides you stitch first, just be sure to follow the pattern so you don't have to un-sew. 


 Step 7: Add the next row around the flower.


Step 8: At this point you can remove the basting stitches and paper from any hexes that are not on the outside edge.  


Can you see how tiny these whip stitches are? I usually get 14-15 stitches per edge.


Step 9: Add in the filler colors and borders.
  

Step 10: Press front and back.


I haven't exactly figured out how to do the backing or binding on this. I've asked around and some say to cut it off so the edges are straight. I would prefer not to do that. If you have any ideas, please let me know. I can use it like this for a while but I can't wash it until I get it completely finished.

 Here are some pictures of assorted Grandmother’s Flower Garden quilts I Googled….. PHOTOS

Be sure to check out my website for new charm packs, layer cakes, and fat quarter bundles. I have lots of new collections from MODA.